


Sorry this is a little later than I planned. It really is a easy basket to make. You need to start with to pieces of 12 x 12 paper, double sided preferably. I am going to use the new Bella Rose paper for the example in the tutorial. The first thing you need to do is score it on all four sides at 3 1/2. I used the scor pal for mine.

Next you will need to cut off the fours corners.

This is what your paper will look like when you you are done.

So far so good? Next you will need to make a mark 1/2 inch in from each of the 8 corners. See picture below.

You will then score from that mark to the corner below it. See picture below.

After you have all eight corners scored at the angle you will fold the score marks. It should look like this when you are done with this part.

These angled tabs will be used to glue the basket sides together. I used Scotch Quick Dry glue. See below.

After attaching all four sides you will then need to cut four circles from you other sheet of dp. I used the large Nestabilites Die to make mine. It measures 3 1/2 inches across. You can use any circle cutter and it can be any size between this and four inches across. I like it a little smaller than the side of the basket but that is an opinion thing.

You will need to fold the four circles in half. Be sure that the opposite side is showing than on the outside of your basket so that all the inside pieces will blend and the outside will show the opposite side of the paper on the circles. See picture below.

Next you will attach half of the circle to the inside of the basket. Don't attach the outside flap yet you will be doing that later.

We are so close at this point. I added a piece of ribbon around the basket at this point just at the bottom of the flap, you will see it in a later picture. Now you need to cut a strip of dp 1 1/2 inches by 12. This will be the handle to your basket. Lay the strip with the side you want showing facing up and put adhesive on the ends. See picture below.

You will be attaching this to the inside of the basket on two of the sides. After you attach it inside your basket you will want to lay your basket on it side to poke a hole in the handle for a brad. Be sure that you have the outside flap of the circle exactly as shown in the pictures below. You do not want to poke the hole through that layer. You will be using that to cover the folder over part of the brad. See picture below.


You will be putting the brad through the hole with the top of the brad on the inside of the basket and the prongs on the outside.

This is what it will look like. Don't worry about the prongs because they will now be covered with the outside part of the flap. Notice the ribbon in the picture now.

Attach you outer flaps down with Snail.

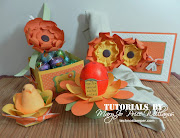
And now your basket is done. This is what it will look like empty.

I would love to see what you put in your basket. I hope this makes sense. If you have any questions at all feel free to ask and I will be happy to help.


2 nice people left a comment:
The easy peasy basket as you call it is gorgeous. I think I would fill mine with chocolate.
How refreshing it is to listen to Christian Music. I leave your web page open so I can listen to it while I work.
Diana, creator of the Scor-Pal.
I agree with Diana - love the music! Thanks!!! Also love the basket! Great tutorial.
Post a Comment